Overview
In this tutorial, we show you how to create a Hello World project with Android Studio and run it on the emulator virtual device.Download Android Studio
Android Studio provides the fastest tools for building apps on every type of Android device. We can download Android Studio from the Android Studio homepage. Here we can download the latest version of Android Studio. Android Studio 3.1.3 is Now Current Version.System requirements
Windows
- Microsoft® Windows® 7/8/10 (32- or 64-bit)
- 3 GB RAM minimum, 8 GB RAM recommended; plus 1 GB for the Android Emulator
- 2 GB of available disk space minimum,
- 4 GB Recommended (500 MB for IDE + 1.5 GB for Android SDK and emulator system image)
- 1280 x 800 minimum screen resolution
Mac
- Mac® OS X® 10.10 (Yosemite) or higher, up to 10.13 (macOS High Sierra)
- 3 GB RAM minimum, 8 GB RAM recommended; plus 1 GB for the Android Emulator
- 2 GB of available disk space minimum,
- 4 GB Recommended (500 MB for IDE + 1.5 GB for Android SDK and emulator system image)
- 1280 x 800 minimum screen resolution
Linux
- GNOME or KDE desktop. Tested on Ubuntu® 14.04 LTS, Trusty Tahr (64-bit distribution capable of running 32-bit applications)
- 64-bit distribution capable of running 32-bit applications
- GNU C Library (glibc) 2.19 or later
- 3 GB RAM minimum, 8 GB RAM recommended; plus 1 GB for the Android Emulator
- 2 GB of available disk space minimum,
- 4 GB Recommended (500 MB for IDE + 1.5 GB for Android SDK and emulator system image)
- 1280 x 800 minimum screen resolution
Install Android Studio on Windows
- If you downloaded an .exe file, double-click to launch android-studio-ide-173.4819257-windows.exe.
- Follow the setup wizard in Android Studio and install any SDK packages that it recommends.
Hello World! Your First Program
Open the Android Studio, then click “Start a new Android Studio project”.Enter the info below:
Application Name: HelloWorld
Company domain: jackrutorial.com
Project location: C:/android/HelloWorld
then click "Next".
Select the form factors and minimum SDK. In this tutorial, We selected the minimum SDK "API 15: Android 4.0.3(IceCreamSandwich)", click "Next".
Select the Empty activity and click "Next".
Leave the activity name “MainActivity”, Click Finish.
Add TextView widget to activity_main.xml layout. Change the activity_main.xml layout to the following.
<?xml version="1.0" encoding="utf-8"?>
<android.support.constraint.ConstraintLayout xmlns:android="http://schemas.android.com/apk/res/android"
    xmlns:app="http://schemas.android.com/apk/res-auto"
    xmlns:tools="http://schemas.android.com/tools"
    android:layout_width="match_parent"
    android:layout_height="match_parent"
    tools:context=".MainActivity">

    <TextView
        android:layout_width="wrap_content"
        android:layout_height="wrap_content"
        android:text="Hello World!"
        />

</android.support.constraint.ConstraintLayout>
Run Hello World App on the Android Emulator
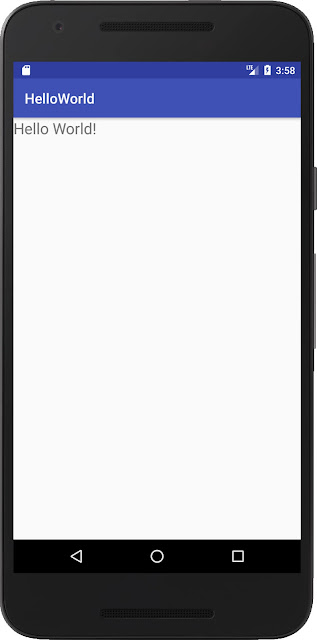
You can run this app from an Android Studio project. Or you can run this app that's been installed on the emulator as you would run any app on a device. To start the emulator and run this app in your project.- Open Android Studio project and click Run.
- In the Select Deployment Target dialog, select an existing emulator definition, and then click OK.
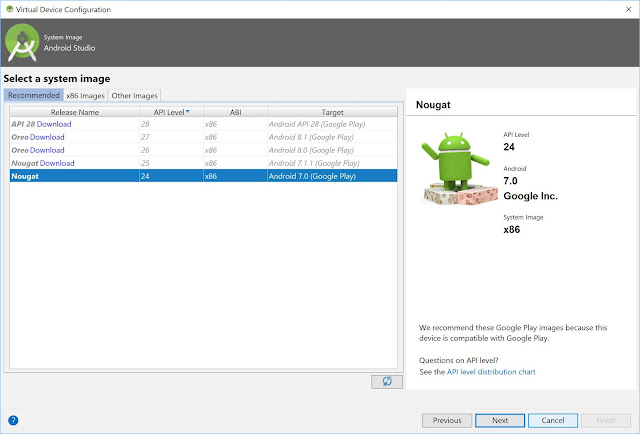
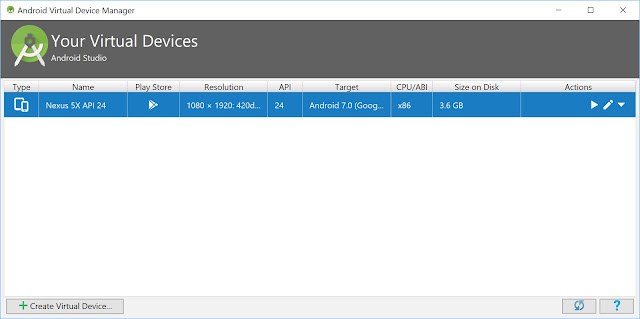
- If you don’t see a definition you want to use, click Create New Virtual Device to launch the AVD Manager. After you define a new AVD, in the Select Deployment Target dialog, click OK.
- If you want to use this emulator definition as the default for your project, select Use same selection for future launches.


